单臂路由怎么配置
农民兄弟杂货铺,通俗易懂,不讲多余的废话,单臂路由是每个学网络的必须要搞精搞明白的。并且这个是一个非常基础的配置。在实战中单臂使用是极少,由于他的开销也是过大。应付小型网络还行,稍大点都不会有单臂路由的存在,居然是必学的,我就以H3C的为例来细讲讲。
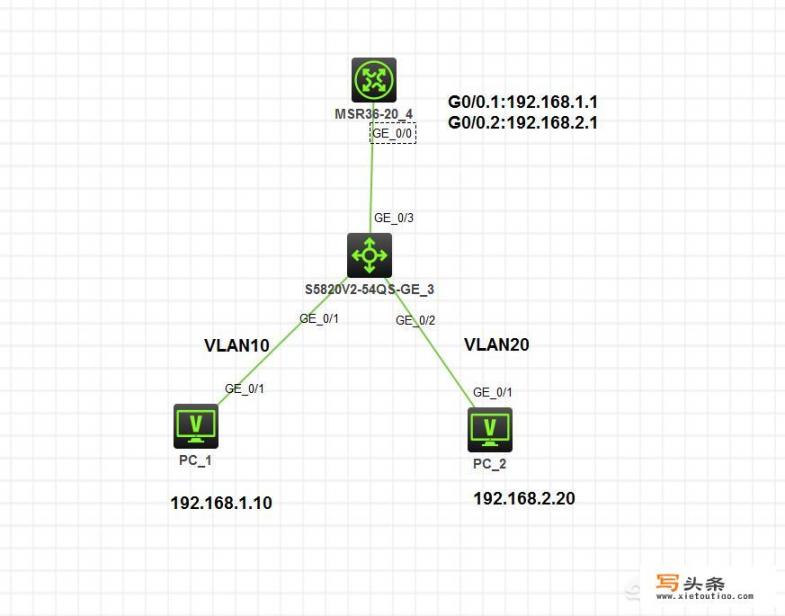
1.网络结构图设置如下这样的。

2.交换机与路由器的硬件接口分配
分别在交换机下设置两个vlan:VLAN10及VLAN20,分配端口在G0/1与G0/2口。交换机的G0/3口设为TRUNK口,与上级路由器相连。路由品的G0/0口分别启动对子接口并设置IP地址为:G0/0.1:192.168.1.1 G0/0.2:192.168.2.1并在各子接口的出口封装对应的VLAN。
3.具体配置方法
以下为交换机上做的配置:
<H3C>sys 进入系统视图操作
System View: return to User View with Ctrl+Z.
[H3C]undo info
[H3C]undo info-center enable 关掉显示中心
Information center is disabled.
[H3C]vlan 10 创建VLAN10
[H3C-vlan10]port g1/0/1 g1/0/1这个口加入VLAN10
[H3C-vlan10]vlan 20 创建VLAN20
[H3C-vlan20]port g1/0/2 g1/0/2 这个口加入VLAN20
[H3C-vlan20]qu退出
[H3C]int g1/0/3 进入3接口
[H3C-GigabitEthernet1/0/3]port link-type trunk 设置为trunk模式
[H3C-GigabitEthernet1/0/3]port trunk permit vlan 10 允许vlan10通过
[H3C-GigabitEthernet1/0/3]port trunk permit vlan 20 允许vlan20通过
[H3C-GigabitEthernet1/0/3]qu
[H3C]save 保存
The current configuration will be written to the device. Are you sure? [Y/N]:y
Please input the file name(*.cfg)[flash:/startup.cfg]
(To leave the existing filename unchanged, press the enter key):
Validating file. Please wait...
Saved the current configuration to mainboard device successfully.
以下为路由器上操作:
数码 <H3C>sys
System View: return to User View with Ctrl+Z.
[H3C]undo info
[H3C]undo info-center en
[H3C]undo info-center enable
Information center is disabled.
[H3C]int g0/0.1 进入路由器的g0/0.1子接口操作。
[H3C-GigabitEthernet0/0.1]ip address 192.168.1.1 255.255.255.0 配置子接口IP地址
[H3C-GigabitEthernet0/0.1]vlan-type dot1q vid 10 设置VLAN的类型为10
[H3C-GigabitEthernet0/0.1]int g0/0.2 进入路由器的g0/0.1子接口操作。
[H3C-GigabitEthernet0/0.2]ip address 192.168.2.1 255.255.255.0 配置子接口IP地址
[H3C-GigabitEthernet0/0.2]vlan-type dot1q vid 20 设置VLAN的类型为20
[H3C-GigabitEthernet0/0.2]qu
[H3C]save 数码
The current configuration will be written to the device. Are you sure? [Y/N]:y
Please input the file name(*.cfg)[flash:/startup.cfg]
(To leave the existing filename unchanged, press the enter key):
Validating file. Please wait...
Configuration is saved to device successfully.
[H3C]ping 192.168.1.10 PING电脑1,可通
Ping 192.168.1.10 (192.168.1.10): 56 data bytes, press CTRL_C to break
56 bytes from 192.168.1.10: icmp_seq=0 ttl=255 time=3.000 ms
56 bytes from 192.168.1.10: icmp_seq=1 ttl=255 time=1.000 ms
56 bytes from 192.168.1.10: icmp_seq=2 ttl=255 time=1.000 ms
56 bytes from 192.168.1.10: icmp_seq=3 ttl=255 time=2.000 ms
56 bytes from 192.168.1.10: icmp_seq=4 ttl=255 time=1.000 ms
--- Ping statistics for 192.168.1.10 ---
5 packet(s) transmitted, 5 packet(s) received, 0.0% packet loss
round-trip min/avg/max/std-dev = 1.000/1.600/3.000/0.800 ms
[H3C]ping 192.168.2.20 ING电脑2,可通
Ping 192.168.2.20 (192.168.2.20): 56 data bytes, press CTRL_C to break
56 bytes from 192.168.2.20: icmp_seq=0 ttl=255 time=4.000 ms
56 bytes from 192.168.2.20: icmp_seq=1 ttl=255 time=2.000 ms
56 bytes from 192.168.2.20: icmp_seq=2 ttl=255 time=2.000 ms
56 bytes from 192.168.2.20: icmp_seq=3 ttl=255 time=2.000 ms
56 bytes from 192.168.2.20: icmp_seq=4 ttl=255 time=1.000 ms
--- Ping statistics for 192.168.2.20 ---
5 packet(s) transmitted, 5 packet(s) received, 0.0% packet loss
round-trip min/avg/max/std-dev = 1.000/2.200/4.000/0.980 ms
然后在电脑上1上与电脑2上可以互相PING通。
以上就是我的回答,希望能帮到你,更的学到资源请转发并关注我,如果你有更好的方法欢迎评论区留言哦。
